Tampilkan postingan dengan label About Windows 8. Tampilkan semua postingan

Jumat, 05 April 2013

Managing Windows 8 apps

Certain aspects of Windows apps can be managed through Group Policy. The previous
 section detailed the Group Policy setting to enable LOB Apps to be installed. Other settings
are configured using AppLocker.

Creating the rules for Windows apps involves configuring rules within the “Packaged 
app Rules” section. You can either configure rules manually, use the Automatically  Generate
Rules option, or Create Default Rules from the context menu. Choosing to Create Default
Rules   automatically generates a rule to allow everyone to run all signed apps, as shown in
 Figure  6-19

However, a default rule to allow everyone to run all signed packaged apps may not be a
likely (or very secure) policy for most organizations. Therefore, you can change this policy to
Deny within its Properties dialog, as shown in Figure 6-20.

Once the rule has been changed to a default Deny policy, you can then add exceptions for
apps that will be allowed to run. This is accomplished through the Exceptions tab. Within the
Exceptions tab, shown in Figure 6-21, you can manage the current exceptions.

Adding an exception is accomplished by clicking Add, which reveals the Add Exception
dialog. Figure 6-22 shows the Add Exception dialog box used to configure an exception for
the app developed earlier in this chapter.

In addition to configuring exceptions for individual apps using their app package, you can
also choose to add exceptions using an installed package. In order for this to work, the app
has to be installed on the computer from which you’re using AppLocker. In the case of 
Figure 6-23, AppLocker was run from a Windows 8 Enterprise computer, therefore exceptions
can be granted for any of the apps installed there.

The enterprise scenario here is to configure exceptions for apps that are allowed, while
disallowing apps that an organization doesn’t want its users to run. It’s worth noting that
 exceptions can be configured based on Active Directory group membership, so certain
groups could be allowed to run the Finance or Travel app.

Sideloading an app in windows 8

To create an app package for distribution through sideloading, you must run the Windows
App Certification Kit. The Windows App Certification Kit is part of the Windows 8 Software
Development Kit (SDK) but is also included with Visual Studio 2012. For example, in the
 Express edition of Visual Studio 2012, selecting Create App Package from the Store menu
starts the Create App Package wizard

The first step of the wizard is where you choose whether or not the package will be
 distributed through the Windows Store. Selecting No, as shown in Figure 6-13, displays the
requirements and limitations for this type of distribution

The package settings are configured next, as shown in Figure 6-14


Kamis, 04 April 2013

Distributing within an Enterprise in windows 8

Distributing an app within an enterprise requires the Enterprise edition of Windows 8. As you
might expect, the process for distributing within an enterprise is different than distributing
through the Windows Store. A typical scenario would have a LOB app developed and then
automatically pushed out to computers within the organization. Aside from the edition of
Windows 8 being used, there are three primary requirements for sideloading apps:
  ■ The target computer must be joined to the domain.
  ■ Group Policy must be set to “Allow all trusted apps to install.”
  ■ The app must be signed by a Certificate Authority (CA) that is trusted by the target
computer.
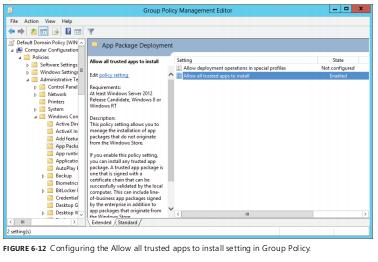
The Group Policy setting is found within the Windows Components\App Package
 Deployment hierarchy, as shown in Figure 6-12


Distributing in the Windows 8 Store

Distributing an app through the Windows Store involves several steps, including creating a
developer account, accepting various terms of service agreements, submitting the app for
approval, and setting its terms, among other things.

As described in the “Windows 8 app certification requirements” (http://msdn.microsoft.com/
library/windows/apps/hh694083.aspx ). Microsoft has several requirements for Windows apps:
  ■ The app must provide value.
  ■ The app must provide more functionality than a simple website.
  ■ The app must behave predictably.
  ■ The app must adhere to privacy and security practices.
  ■ The app’s content and subject matter must be appropriate for many audiences.
  ■ The app must be identified easily with a unique name and other information.

The certification process

The certification process to distribute an app through the Windows Store is a multistep
process. In the first step of the process, the app package is uploaded to Microsoft where it’s
checked for compliance with various app certification requirements
Among the tests that Microsoft performs are the following:
1.   Security tests, which are fairly basic malware-type scans.
2.   Technical compliance tests. The Windows App Certification Kit is used to test the app
      for compliance. The Windows App Certification Kit can also be used by the developer
      prior to submission in order to perform the same tests and help ensure a successful
      test when performed by Microsoft.
3.   Content compliance tests. The final test prior to release, the content compliance test is
     a manual process performed by someone at Microsoft.

When an app is approved, Microsoft performs digital signing of the app to prevent
 tampering, and then publishes the app to the Windows Store. However, you can set the
 release date and other aspects of the app, as described in the next section.

The app purchase experience

When potential customers find your app through the Windows Store, it’s your chance to
entice them to install or purchase your app. You do this by setting up a page on the  W indows
Store for your app. Your app’s page contains at least one screenshot (though more are
 encouraged) and other details about your app, such as its description, purchase price, rating,
and other details pertinent for the potential customer to know.

You choose the pricing model and structure for app distribution. You can offer the app for
free, provide a time-limited trial, a feature-limited trial, or set a price for the app that must
be paid prior to download. You can also set up in-app purchases to sell additional features
to customers. A frequent model for apps is ad-supported, whereby the app is offered for
free but then advertisements are displayed within the app. You can use any ad platform that

meets Microsoft’s certification requirements—which offers great flexibility to obtain the
 highest revenue for an ad-supported app.

Using Visual Studio to build a Windows 8 app

This section demonstrates how easy it is to build a Windows App. The demonstration shown
here will use Visual Studio 2012 Express edition for Windows to build an App. This example
builds a simple app that shows a list of the files inside of the Documents library on the
 computer and enables the user to select a file

The first step in building a Windows app is to choose a programming language and an
appropriate template. We’ll use JavaScript with the Blank App template for this example. This
is shown in Figure 6-5.

Once a template is chosen, Visual Studio opens the code for the chosen template. In this
case, the code is shown in Figure 6-6.

Visual Studio takes care of all of the behind-the-scenes setup and configuration for the
app based on the chosen template. This means that you could compile and run the project
as-is and it would display. In the case of the Blank App template, a blank screen with a simple
“Content goes here” note is displayed

Creating an app using one of the templates requires using the helper functions (created
automatically by the template), and then customizing and adding to them to produce the
app. In this example, we’ll add a single function to access some built-in functions that create a
File Picker.

With that code in place, the next area of customization needed is within the HTML file. The
Blank App template includes a default HTML file. The file, aptly titled default.html, contains
basic HTML and also the links to include CSS and JavaScript for the app. This file is shown
when the app is loaded, though this can be changed to start with any file that is appropriate
for your app.

For the example here, we’ll customize default.html for our needs. Specifically, we’ll add
some HTML, JavaScript, and also some CSS to the file. Like the JavaScript example, in a
 real-world scenario where you’re building a more complex app, it’s likely that the CSS would
be in a separate file and that the JavaScript would be as well.

The bottom portion of default.html is shown in Figure 6-8, with the new items highlighted
(the code above this in default.html is not changed).

With default.html saved, the app can be run, typically by pressing F5. The app’s splash screen
is shown and then the app is loaded. The output of the initial screen is shown in Figure 6-9.
Clicking or tapping the “Get Files List” button reveals the File Picker screen, shown in
 Figure  6-10.

The File Picker screen is built and its interface is set up primarily by the built-in functions
available as part of the Windows app library. This provides a consistent interface for the  
user when choosing files on the Windows 8 platform. Once a file has been chosen it  receives
a checkmark (like the one shown in Figure 6-10). Clicking or tapping Open then hands

 processing to your app, where you can perform the appropriate action for the file. In this case,
we merely output the name of the file back to the original screen, as shown in Figure 6-11.


This demonstration shows how easy it is to create a Windows app. In just a few lines of
JavaScript, HTML, and CSS, an app was created to choose files from the Documents library  
of a computer.

Once an app is created, it needs to be distributed. App distribution is accomplished either
by making the app available in the Windows Store or by loading it for internal-use only
through a process called sideloading . Both of these distribution methods are the focus of the
next two sections.

Building a Windows 8 app

Any edition of Visual Studio can be used to build apps for Windows. Though most
 organizations will use the Professional, Premium, or Ultimate version of Visual Studio, the
Express edition for Windows also includes the necessary Software Development Kit (SDK) for
developing Windows apps.

         When an App is built, it becomes an App Package. The App Package contains the files for
the App along with the package manifest. The package manifest contains information about
the App, including how it interacts with the computer or device, what resources it needs, and
so on

         Organizations can continue to use their language of choice for developing Windows apps.
For example, an organization standardized around Visual C# development with the requisite
in-house expertise can continue to use Visual C# for Windows App development. One of the
most powerful features of Windows apps is that they can be built using several languages:
  ■ JavaScript
  ■ Visual Basic
  ■ Visual C#
  ■ Visual C++

       Among these languages, Visual Basic, Visual C#, and Visual C++ are traditional client-side
languages that can be used to build server-side web applications. However, the addition of

      JavaScript is noteworthy for Windows app development. The inclusion of JavaScript in the
available languages for Windows app development means that organizations with expertise
in HTML, CSS, and JavaScript can build fully functional Windows apps that have the same
capabilities as apps developed in the other languages.

        Visual Studio includes five templates customized for each of the available Windows
App development languages. The templates help with the development process and show
 common design patterns and layouts for Windows apps. Some of the templates are shown in
Figure 6-2.

      The five templates provide a good sampling of the design patterns needed for many types
of apps. The type of information and user interaction expected for the app drives the choice
of template. For example, an app that needs to display more than one item might choose a
Grid App template, such as the one shown in Figure 6-3

      An app that needs to enable drill-down for detailed information might choose a Split App
template, such as the one shown in Figure 6-4.

       If one of the available templates isn’t appropriate, the developer can use Blend to design
the layout for the app


Rabu, 03 April 2013

A look at Windows 8 apps

Windows apps extend the “app” experience to Windows 8. This experience has become
popular over the last several years with the increased use of mobile computing with
seamless application delivery and installation. Windows apps are built using Microsoft
Visual Studio and are delivered through the Windows Store, in much the same way that
other platforms have their own application delivery stores.
         Windows apps have certain features and characteristics that make them distinct from
traditional applications. Windows apps:
  •    May be launched primarily through an application Tile, which can update
 dynamically
  •  May be placed in the background and communicate with other apps.
  •    Exists through a full-screen, chromeless interface.
  •    Can be viewed and used in multiple display types and views.
  •    Support touch, pen input, and gestures as some of the primary means of user
 interaction.
Windows apps display in the Windows 8 user interface (UI) shown in Figure 6-1.
As described in the next section, Windows apps are built using Visual Studio 2012. Apps
can be built using several programming languages but all use the same Windows Runtime
Application Programming Interface (API) to access the standard Windows app library and
other application functions.

Apps, more formally known as App Packages (with the extension .appx), can be distributed
within an organization or made available through the Windows Store. Distributing through
the Windows Store has its own set of rules, as described later in this chapter. Once distributed
in the Windows Store, the app is available to the public. Apps distributed within an enterprise
don’t need to be certified by Microsoft but do need to be signed with a trusted certificate.

Windows app lifecycle

Apps have a specific lifecycle, from the time they are removed to their removal. During an
app’s lifecycle, it can go through any of the following stages:
  ■ App launch
  ■ App activation
  ■ App suspend
  ■ App resume
  ■ App close
  ■ App crash
Additionally, there are two other special states: App Visibility and App Removal.

Preparation and requirements windows 8

Properly preparing for a deployment such as Windows To Go increases its overall   success.
There are few preliminary requirements for Windows To Go, because it is intended to 


Windows To Go

Windows To Go is an innovative feature found in the Enterprise edition of Windows 8 that
enables the creation of a portable Windows 8 workspace hosted on a flash drive. By simply
placing a configured bootable Windows To Go USB drive into a computer and booting to it, a
user can access their personal Windows 8 desktop regardless of the operating system that  
is installed on the PC. The bootable Windows To Go workspace can also use the same
 Windows 8 images that are used on desktops or laptops in the enterprise. This allows you 
to use an existing image when provisioning Windows To Go.

          The portability and flexibility provided by Windows To Go standardizes the same   user
experience wherever users go. This allows for greater efficiency in offsite productivity and
overall familiarity of Windows 8 to the user. For Example, if a person uses Windows 8 at work
and other operating systems at home, placement of settings and applications can get very
confusing. Windows To Go remedies this situation and many others by providing the exact
same layout on any computer that a user inserts their USB drive. Windows To Go is also not
as volatile as you would think an operating system booted from a USB drive would be. If the
drive is suddenly disconnected, there is a 60-second window for the drive to be put back in
and resume functionality, exactly where it left off. Features like this make Windows To Go a
user-friendly way to unify the work and work-at-home environments


Deployment options in Windows 8

The Windows ADK is the fundamental collection of tools for configuring and   deploying
 Windows 8. You use these tools individually or directly infrequently, however. Instead,
 Microsoft provides a variety of deployment options that are built on top of the Windows ADK

MDT 2012 is one of the most popular toolsets built on top of the Windows ADK. It’s more
of a deployment framework. MDT 2012 helps manage deployment content in preparation
for deployment, and then collects and applies deployment information through wizards at
the time of deployment. MDT 2012 allows you to control the level of information required at
deployment time. MDT 2012 also allows you to perform fully automated deployments that
require no deployment information at the time of deployment.

MDT 2012 can be used by itself or in conjunction with Configuration Manager. Although
Configuration Manager is very capable of deploying Windows 8 without using MDT 2012,
Microsoft recommends that you use MDT 2012 with Configuration Manager to extend
its   capabilities with a deployment framework based on years of real-world experience.
 Essentially, MDT 2012 is like having dozens of deployment experts writing custom code to
support your Windows 8 deployment.

Microsoft Deployment Toolkit 2012 Update 1

MDT 2012 (Figure 5-1) helps automate the deployment and ongoing management of
 Windows 8 deployment content. It leverages and automates the tools in the Windows ADK to
deploy Windows 8 and applications along with it. MDT 2012 provides wizards that help in the
initial creation of deployment content.


As previously mentioned, Configuration Manager is more than capable of deploying
Windows 8 without using MDT 2012. However, MDT 2012 adds an additional framework to
Configuration Manager that helps you build a more flexible and more intelligent deployment
process for your organization.
Learn more about operating system deployment with Configuration Manager on TechNet
at http://technet.microsoft.com/en-us/library/gg682018.aspx.

Desktop virtualization

Desktop virtualization isn’t really a deployment tool as much as it is an alternative way to
deliver desktop environments to users. It enables you to provide a work desktop to users that
they can access from any device. The result is that you can more easily and more   responsibly
adopt Bring Your Own Device (BYOD) programs in your company. The topic is significant
enough that it gets its own chapter in this book. See Chapter 11, “Windows 8 virtualization,”
to learn more

Windows 8 Assessment Services

The final component in the Windows ADK is the Windows Assessment Services   component
(Windows ASC). Windows Assessment Services is a test framework used to automate
 running assessments that measure performance, reliability, and functionality on multiple
computers in a lab environment. It helps you eliminate fragmented, error-prone, expensive,
 pre-deployment test processes, and enables you to replace multiple steps and inconsistent
tools with just one tool.

          Windows ASC is the graphical user interface that interacts with Windows Assessment
Services. This enables you to manage settings and assets, such as which lab computers to
test, which images should be applied to those computers, and which assessments should be
run on the test computers. You can use Windows ASC to monitor the progress of a running
job and to view and compare the results that were produced. Additional benefits include the
 ability to import results into a central database for consolidated report generation.

Windows 8 Performance Toolkit & Windows Assessment Toolkit

Windows Performance Toolkit

The Windows Performance Toolkit (WPT) contains performance monitoring tools that
 produce in-depth performance profiles of Windows operating systems and applications. 
It is a powerful recording tool that creates Event Tracing for Windows (ETW) recordings. You
can run the WPT from the WPT user interface or from the command line. It provides  built-in
 profiles that you can use to select the events that are to be recorded. Alternatively, you can
author custom profiles in XML. The WPT is a powerful analysis tool that combines a very
 flexible user interface with extensive graphing capabilities and data tables that can be  pivoted
and that have full text search capabilities. It allows you to explore the root cause of any
 identified performance issues.

Windows Assessment Toolkit

Another component in the Windows ADK is the Windows Assessment Toolkit. The Windows
Assessment Toolkit helps you determine the quality of a running operating system or a set
of components with regard to performance, reliability, and functionality. The toolkit includes
the tools that you need to assess a local computer, review the results, diagnose problems, and
determine how to make improvements. Assessments can be performed using the Windows
Assessment Console or command-line tools

Volume Activation Management Tool windows 8

The Volume Activation Management Tool (VAMT) enables you to automate and centrally
manage the volume and retail-activation processes of Windows, Microsoft Office, and select
other Microsoft products. The VAMT can manage volume activation using Multiple   Activation
Keys (MAKs) or Key Management Service (KMS) and is typically deployed in enterprise
 environments. The VAMT is a standard Microsoft Management Console (MMC) snap-in
that requires MMC 3.0. You can install it on any computer running Windows 8, Windows 7,
 Windows Server 2012, or Windows Server 2008 R2

User State Migration Tool in Windows 8

The User State Migration Tool (USMT) migrates user profiles and files from existing Windows
operating systems to Windows 8. It captures the user state from the existing operating system
and restores the user state to Windows 8.
The USMT includes three command-line tools:
  •    ScanState.exe   The ScanState.exe tool captures user state from the existing  operating
system (such as Windows XP, Window Vista, Windows 7, or Windows 8). You can
store the captured user state on a removable drive or on a network shared folder.
The ScanState.exe tool can also estimate the amount of disk storage required by the
migrated user state.
  •    LoadState.exe   The LoadState.exe tool restores the captured user state from the
location where it is stored by the ScanState.exe tool.
  •    UsmtUtils.exe  The UsmtUtils.exe tool performs functions related to user state
 migration, such as extracting files from a compressed migration store or removing
hard-link stores that cannot be otherwise deleted due to a sharing lock.

             USMT includes three .xml files that configure the user state capture and restore process
(MigApp.xml, MigDocs.xml, and MigUser.xml). In addition, the Config.xml file specifies files
or configuration settings to exclude from the migration. You can create custom .xml files to
 support specialized migration needs.

              Both MDT 2012 and Configuration Manager rely on USMT to migrate user states. At
the appropriate time during the deployment process, the ScanState.exe and LoadState.exe
command-line tools automatically run to migrate user state. You can customize the process in
both deployment tools.

Windows 8 Preinstallation Environment

The Windows Preinstallation Environment (Windows PE) is a minimal operating system
designed to prepare a computer for Windows installation by starting a computer that has no
operating system. During Windows deployment, you can use Windows PE to partition and
format hard drives, copy disk images to a computer, and start Windows Setup from a network
share.

            Windows PE 4.0 is based on the Windows 8 operating system, and it is available as a
 standalone product to customers who have the appropriate licensing agreement. It is an
 integrated component of many Windows technologies, including Windows Setup and
 Windows Deployment Services. Both MDT 2012 and Configuration Manager rely on it.

Customized Windows PE images can be created using the tools provided with Windows
PE. MDT 2012 and Configuration Manager can also create customized Windows PE images.

Selasa, 02 April 2013

New deployment scenarios in windows 8

The deployment strategies that the previous section describes are traditional. You install an
operating system on a physical PC. However, desktop virtualization enables new deployment
scenarios that can streamline and simplify Windows 8 deployment.
Windows To Go
Windows To Go offers a new alternative to traditional operating system deployment.
 Windows To Go is a Windows 8 Enterprise feature that enables users to boot and 
run   Windows 8 from a USB drive. It provides a flexible way for workers to access their 
personal desktop on any PC. The article “Windows To Go: Feature Overview” at 
http://technet.microsoft.com/en-us/library/hh831833.aspx provides additional  information
about Windows To Go as well as step-by-step instructions for preparing, securing, and
 managing Windows To Go devices.
Virtual Desktop Infrastructure
Microsoft Virtual Desktop Infrastructure (VDI) is an alternative desktop delivery model that
gives users secure access to centrally managed desktops running in the datacenter. VDI is
powered by Remote Desktop Services (RDS), which is a server role in Windows Server 2012.
It provides a single platform to deliver any type of hosted desktop, and RemoteFX provides
a consistently rich user experience. RDS enables organizations to choose the deployment
method that works best for them—all by using a single platform.
  •    Session-based desktops  Session-based desktops provide users access to
 applications, data, and shared desktops centralized in the datacenter from a webpage,
through a SharePoint portal, on a local desktop, or over the Internet.
  •    Pooled virtual machines (VMs)   Pooled VMs give users access to high-performance
desktops from any connected device. VDI assigns VMs on demand from an existing
pool to users. When they log off a VM, VDI returns it to the pool for use by another
user.
  •    Personal VMs  Personal VMs give users access to a personal, high-performance
 desktop over which they have full administrative control.
With all three VDI deployment methods, user state virtualization maintains users’ data
and settings across physical and virtual sessions. VDI empowers enterprises with unified
 management of centralized desktops and corporate data by using System Center 2012. IT can
extend existing management tools and processes to the VDI environment.
Partner technology, such as Citrix XenDesktop, adds value to VDI by offering additional
scale and flexibility to enterprises. With Citrix technologies, users can access their Windows
environment even from non-Windows devices.
Chapter 11, “Windows 8 virtualization,” provides more information about Windows 8 and
VDI. You can also learn more on the Desktop Virtualization website at  http://www.microsoft
.com/dv .

Client Hyper-V
On PCs running Windows 8, Client Hyper-V provides a robust virtual platform for  d evelopers
and IT pros. It supports a broad range of devices and leverages the driver ecosystem of
 Windows 8 to run on the broadest range of 64-bit PCs. Client Hyper-V provides a rich user
experience, including multimedia, touch, and USB support. Because Client Hyper-V is a core
part of Windows 8, it leverages all of that operating system’s security and management
 features.
Client Hyper-V requires the following:
  ■ A 64-bit system
  ■ 4 GB of RAM is required
  ■ Support for Second Level Address Translation (SLAT)
SLAT unloads from the processor the process of mapping physical memory to  v irtual
memory. For intensive graphics, it provides significant performance improvements. It
is   r equired for Hyper-V on Windows 8, because most systems have extensive graphics
 capabilities. It’s only required for Windows 8 Server when enabling the RemoteFX role service.
For more information, see the article “Client Hyper-V” at http://technet.microsoft.com/en-us/
library/hh857623.aspx.

Deployment strategies in Windows 8

Microsoft recommends a few targeted strategies for deploying Windows 8. These strategies
range from manually configuring Windows 8 on a few computers to using automation tools
and technologies to deploy the operating system to thousands of computers.
The following list describes the four recommended deployment strategies:
  •    High Touch with retail media   This is a hands-on, manual deployment, where you
install Windows 8 on each client PC by using the retail installation media, and then you
manually configure each PC. Microsoft recommends this strategy if your organization
does not have dedicated IT staff, and it has a small, unmanaged network with fewer
than 100 client computers.
  •    High Touch with standard image  This strategy is similar to the High Touch with
retail media strategy, but it uses an operating system image that includes your
 customizations and application configurations. Microsoft recommends this  strategy
if your organization has at least one IT pro (with or without prior deployment
 experience) on staff, and a small or distributed network with 100–200 client PCs.
  •   Lite Touch, high-volume deployment   This strategy requires limited interaction
during deployment. Interaction occurs at the beginning of the installation, but the
remainder of the process is automated. Microsoft recommends this strategy if your
organization has a dedicated IT staff, and it has a managed network with 200–500
client computers. Prior deployment experience is not required, but it is beneficial for
using this strategy.
  •    Zero Touch, high-volume deployment  This strategy requires no interaction
 during deployment. The process is fully automated by using Configuration Manager.
 Microsoft recommends this strategy if your IT organization has experts in deployment,
networking, and Configuration Manager, and it has a managed network with 500 or
more client computers.

User state migration in Windows 8

Operating system deployment always involves user state migration—the process of migrating
users’ documents and settings from one operating system to another. Even when you don’t
migrate user state during deployment, users can spend countless hours trying to restore their
preferences (such as desktop backgrounds, screensavers, and themes). Because this manual
process reduces user productivity and usually increases support calls, you might choose to
migrate some portion of user state to Windows 8 as you deploy it

User satisfaction is another reason to elevate the importance of user state migration in
your project. Users are simply more satisfied and feel less overwhelmed when they sit down in
front of a new operating system and they don’t have to recover their preferences. Unsatisfied
users can have negative consequences for future deployment projects

The primary tool you use to migrate user state during a high-volume Windows 8
 deployment is the User State Migration Tool (USMT). Version 5.0 is the most recent version of
USMT supporting Windows 8 migrations. USMT is part of the Windows ADK (see Chapter 5, 
“Deploying Windows 8”). USMT can perform complex, repeatable migrations of user state
data between earlier Windows versions and Windows 8.

There are a few different ways to use USMT:
  •    Script USMT.
  •    Run it as part of a Microsoft Deployment Toolkit (MDT) 2012 Update 1 Lite Touch
Installation (LTI).
  •    Run it as part of a System Center 2012 Configuration Manager Zero Touch Installation
(ZTI).
  •    Run it directly at the command prompt.
 Running USMT in MDT 2012 Update 1 or Configuration Manager task sequences is
 probably the simplest way to use USMT. (System Center 2012 Configuration Manager with
Service Pack 1 is required for Windows 8.) Both include built-in support for running USMT
pre-deployment (to gather user state) and post-deployment (to restore user state). This   ability
allows you to focus on planning for and customizing the USMT to migrate the data and
 settings required in your organization.

Common compatibility problems in Windows 8

The following list describes common sources of compatibility issues for Windows 8,
 particularly when using an application originally designed for Windows XP.
  •   User Account Control (UAC)  In Windows 8, by default, all interactive users, including
members of the Administrators group, run as standard users. UAC is the mechanism
through which users can elevate applications to full administrator privileges. Because
of UAC, applications that require administrator rights or check for administrator 
privileges behave differently in Windows 8, even when run by a user as administrator
  • Windows Resource Protection (WRP)  WRP is designed to protect the system in a
read-only state to increase system stability, predictability, and reliability. This will affect
specific files, folders, and registry keys. Updates to protected resources are restricted
to the operating-system trusted installers (TrustedInstaller group), such as Windows
 Servicing. This helps to protect components and applications that ship with the
 operating system from any impact of other applications and administrators. This can
be an issue for custom installations not detected as set up by Windows 8 when they try
to replace WRP files and registry settings and check for specific versions and values.
  •    Internet Explorer Protected Mode (IEPM)   In Windows 8, Microsoft Internet
 Explorer 10 processes run in IEPM with greatly restricted privileges to help protect
 users from attack. IEPM significantly reduces the ability of an attack to write, alter,
or destroy data on the user’s computer, or to install malicious code. This could   affect
 ActiveX controls and other script code that tries to modify higher integrity level
 objects.


Senin, 01 April 2013

ACT 6.0 improvements In Windows 8

ACT 6.0, the most recent version of the toolkit, adds support for Windows 8. The following list
describes ACT:
  •    Support for Windows 8  ACT 6.0 adds support for Windows 8.
  •    Runtime-analysis package  The runtime-analysis package gathers compatibility
information. You install it on PCs running Windows 8 for compatibility testing. Data
from the runtime-analysis package replaces data from issue detectors that attempt to
forecast compatibility issues by running on a previous version of Windows.

  •  Streamlined inventory collection   Limiting the inventory-collector package to
inventory collection reduces data collection overhead. The redesigned inventory-collector package does not cause application conflicts because it does not interact with
applications, so you do not have to schedule the inventory-collector package to avoid
conflicts.
  •   Application grouping  The application reports in Application Compatibility Manager
(ACM) group multiple versions of an application together under a single parent entry.
  •    Restructured ACT documentation  ACT 6.0 includes streamlined documentation to
help you find information more quickly and conveniently.
  •    Windows Assessment and Deployment Kit (Windows ADK) integration  ACT is  
now part of the Windows ADK. The Windows ADK (see Chapter 5, “Deploying 
Windows 8”) consolidates the assessment and deployment tools in one place.
  •    Focus on Operating System Deployment  ACT 6.0 focuses on operating system
deployment. It no longer includes update compatibility