Tampilkan postingan dengan label Microsoft Office. Tampilkan semua postingan

Kamis, 28 Februari 2013

Microsoft Outlook Express - POP3 - IMAP - Gmail

To set up your Outlook Express client to work with Gmail:
  1. Enable IMAP in Gmail. Don't forget to click Save Changes when you're done.
  2. Open Outlook Express.
  3. Click the Tools menu, and select Accounts.
  4. Click Add, and then click Mail.
  5. Enter your name in the 'Display name' field, and click Next.
  6. Enter your full email address (username@gmail.com) in the 'Email address' field, and click Next. If you are a Google Apps user, enter your full address in the format 'username@your_domain.com.'
  7. For 'My incoming mail server is a ______ server', please select IMAP in the drop-down menu.
  8. Enter 'imap.gmail.com' in the 'Incoming mail (POP3, IMAP or HTTP) server' field. Enter 'smtp.gmail.com' in the 'Outgoing mail (SMTP) server' field.
  9. Click Next.
  10. Enter your full email address (including '@gmail.com' or '@your_domain.com') in the 'Account name' field. Enter your password in the 'Password' field, and click Next.

11. Click Finish.
12. Highlight imap.gmail.com under Account, and click Properties.
13. Click the Advanced tab.
14. Under Outgoing Mail (SMTP), check the box next to 'This server requires a secure connection (SSL).'
15. Enter '465' in the 'Outgoing mail (SMTP)' field.


16. Under Incoming mail (IMAP), check the box next to 'This server requires a secure connection (SSL)'. The port will change to '993'.
17. Click the Servers tab, and check the box next to 'My server requires authentication.'
18. Click OK.

Setup Outlook 2003 - POP3 - IMAP - Gmail

To set up your Outlook 2003 client to work with Gmail:

1. Enable IMAP in Gmail. Don't forget to click Save Changes when you're done.
2. Open Outlook.
3. Click the Tools menu, and select E-mail Accounts...
4. Click Add a new e-mail account, then click Next.
5. Choose IMAP as your server type by clicking the radio button, and click Next.
6. Fill in all necessary fields to include the following information:

User Information
  • Your Name: Enter your name as you would like it to appear in the From: field of outgoing messages.
  • Email Address: Enter your full email address (username@gmail.com). Google Apps users, enter your address in the format username@your_domain.com
Server Information
  • Incoming mail server (IMAP): imap.gmail.com
  • Outgoing mail server (SMTP): smtp.gmail.com
Login Information
  • User Name: Enter your full email address (including @gmail.com or @your_domain.com)
  • Password: Enter your Gmail password.
7. Click More Settings... and then click the Outgoing Server tab.
8. Check the box next to 'My outgoing server (SMTP) requires authentication' and select Use same settings as my incoming mail server.
9. Click the Advanced tab, and check the box next to 'This server requires an encrypted connection (SSL)' under Incoming Server (IMAP).
10. Check the box next to 'This server requires an encrypted connection (SSL)' under Outgoing Server (SMTP), and enter 465 in the Outgoing server (SMTP) box.
11. Click OK.
12. Click Test Account Settings... After receiving the message 'Congratulations! All tests completed successfully', click Close.
13. Click Next, and then click Finish.

How to Setup Outlook 2007 - POP3 - IMAP - Gmail

  1. Open Outlook.
  2. For new setups, select Do not upgrade.
  3. Click Yes.
  4. Enter your display name, email address (including '@gmail.com'), and password. Google Apps users, enter your full email address, e.g. 'username@your_domain.com.'
  5. Select the 'Manually configure server settings or additional server types' checkbox.
  6. Select Internet E-mail.
  7. Settings: name, full email address (including '@gmail.com' or '@your_domain.com')

    * In the Account Type dropdown menu, select IMAP; enter the incoming and outgoing server names shown below.
    * In the 'User Name' field, give your full Gmail address, including '@gmail.com' or '@your_domain.com.'
    * After creating these settings, clicking Next takes you to the end of the setup.
  8. In the Tools menu, select Options then Mail Setup. Under 'Email Accounts,' click E-mail Accounts.
  9. Select an account, and click Change above the list of accounts. Click More Settings, then the Advanced tab.

    * Incoming server must be 993, and must use SSL encryption.
    * Outgoing server can use 587, TLS encryption.
  10. Click the Outgoing Server tab. Make sure that 'My outgoing server (SMTP) requires authentication' is selected. The radio button 'Use same settings as my incoming mail server' should also be selected
    .
  11. Click OK > Next > Finish > Close > OK.

Scanpst.exe (Tips Microsoft Outlok)

                Scanpst.exe is a free utility from Microsoft designed to repair corrupt or damaged Outlook PST files. You can look for a free scanpst.exe download, but that isn’t very safe as you never know what kind of file you might be getting from the Internet. And it isn’t necessary. Every version of Outlook, including XP, 2000, 2003, 2007, etc. (even the latest Microsoft Outlook 2010) includes a copy of the “Inbox Repair Tool”, which is the name for the scanpst.exe software program.

The problem is that the Microsoft Office/Outlook installer places the repair program in hard-to-find locations and makes it a hidden file. So make sure you search all your system files and you should be able to find it (more details on this below).
Scanpst.exe Errors

The other challenge you will have is that this free tool does a rather poor job of fixing the errors and recovering all the data from an Outlook.pst or Personal Folders File, which is the single file in which all your email messages, contact records, shared items, appointments, journal entries, calendar events, alarms, schedules and other valuable information is stored. Because of that, there are several third-party PST repair tools available that do a much better job at PST recovery and repair.

Fortunately, all of the good utilities have trial versions that you can download and try out on your own Outlook files to see if they will be able to solve the problem better than Scan Pst. It would be nice if there were reviews for each of these programs, but that just isn’t practical. There are an almost infinite number of ways that a PST file can get damaged.

There are known bugs that can cause things like an 0X80040600 error, or you might lose power and have your computer shut down while Office was in the middle of updating your email or contact records. Or your file might have grown larger than the 2gb file size limit some older versions weren’t able to handle. Or a bad bit on your hard drive could alter the encoding of the file, which is a database file under the covers, making it impossible for Outlook to read it properly.

PST Repair Tools

So even though you’d like to be able to find out which is the best *.pst repair tool, and which ones are no good, you really have to try one or more of them yourself and see how they work for you. And if you have a big file, the process might take a while. But if you data has any value to you at all, it might be worth the time, hassle, and expense to buy a tool that can repair the damage, recover your data, and reduce your file size.

Here are some options to consider.

[Note that most of the products listed here advertise that they have a money back guarantee. So if you do buy one of these just make sure you use it promptly and, if it fails to solve your problem, ask for a refund before the 30 days has gone by. Also look for a vendor that provides online support, as these do, since recovering a broken .pst file can be tricky and you might need help.]

1. Stellar Phoenix has been around for a long time and specializes in data recovery in general. They have an award-winning Stellar Outlook PST Repair program that you can download and try out here. Many consider them one of the best, so you might want to start with them first. Stellar Phoenix Outlook includes a password recovery and file splitting utility as part of their package.

2. Another well-established vendor is Nucleus Data Recovery, makers of the Kernel for Outlook PST Repair Tool, which you can download and evaluate from here. Kernel is available in three different licenses, Personal (single user), Corporate (install on multiple machines at the same company) and Technician (use to fix PST files for clients), which might be handy, depending on how many files you need to repair.

3. Data Numen has been around a long time and makes a variety of data recovery products, including their Advanced Outlook Repair (AOR) tool. This could very well be the most expensive option of all, so be sure to read more about it and download the free demo before making a final decision.

4. Disk Doctors has an Outlook Mail Recovery Program with a demo download and more information here. However, they do NOT offer any refund on this product, so this might not be the best first choice. Make sure you evaluate this one fully before you consider purchasing

Simpan Dokumen Tepat di Sasaran

My Document itu folder standar tempat menyimpan berbagai file dokumen yang dibuat dengan Word. Tipe file apapun yang ingin Anda buat disimpan di folder itu. Sebetulnya sih enggak ada masalah menyimpan di folder itu. Tapi ingat, My Document itu letaknya di drive C, satu drive dengan Windows. Kalau ada masalah dengan sistem, data terancam hilang.

Supaya aman, pindahkan ke folder lain. Untuk selanjutnya, penyimpanan jangan di My Document. Tapi di folder lain. Supaya dokumen langsung tertuju ke folder lain itu ada triknya.Ini dia triknya.
  1. Klik [Tools] > [Options], selanjutnya akan muncul kotak dialog “Options”.
  2. Pilih tab [File Locations], kemudian “File types: Documents” akan otomatis tersorot. Lalu klik [Modify] dan pilih folder yang Anda inginkan. Misalnya D:-Dataku, kemudian klik [OK]. Setelah itu, ubah default file location.
Nah, sekarang coba simpan dokumen Anda. Dokumen tersebut akan langsung tertuju pada folder yang Anda maksud.

Understand the basics of an Access database

A database is a collection of information that is related to a particular subject or purpose, such as tracking customer orders or maintaining a music collection. If your database isn't stored on a computer, or only parts of it are, you may be tracking information from a variety of sources that you must coordinate and organize.

For example, suppose the phone numbers of your suppliers are stored in various locations: in a card file containing supplier phone numbers, in product information files in a file cabinet, and in a spreadsheet containing order information. If a supplier's phone number changes, you might have to update that information in all three places. In a well-designed Access database, the phone number is stored just once, so you only have to update that information in one place. As a result, when you update a supplier's phone number, it is automatically updated wherever you use it in the database.

What are these objects? (Tips Microsoft Acces)

When you create a database, Access offers you Tables, Queries, Forms, Reports, Macros, and Modules. Here's a quick overview of what these are and when to use them.

Tables. All data is stored in tables. When you create a new table, Access asks you define fields (column headings), giving each a unique name, and telling Access the data type. Use the "Text" type for most data, including numbers that don't need to be added e.g. phone numbers or postal codes. Using Wizards, Access will walk you through the process of creating common tables such as lists of names and addresses. Once you have defined a table's structure, you can enter data. Each new row that you add to the table is called a record. To define relationships between tables, click Database Tools | Relationships in Access 2007, or choose Relationships from the Tools menu in Access 95, 97, 2000, or choose Relationships from the Edit menu (Access 1, 2).

Queries. Use a query to find or operate on the data in your tables. With a query, you can display the records that match certain criteria (e.g. all the members called "Barry"), sort the data as you please (e.g. by Surname), and even combine data from different tables. You can edit the data displayed in a query (in most cases), and the data in the underlying table will change. Special queries can also be defined to make wholesale changes to your data, e.g. delete all members whose subscriptions are 2 years overdue, or set a "State" field to "WA" wherever postcode begins with 6.

Forms. These are screens for displaying data from and inputting data into your tables. The basic form has an appearance similar to an index card: it shows only one record at a time, with a different field on each line. If you want to control how the records are sorted, define a query first, and then create a form based on the query. If you have defined a one-to-many relationship between two tables, use the "Subform" Wizard to create a form which contains another form. The subform will then display only the records matching the one on the main form.

Reports. If forms are for input, then reports are for output. Anything you plan to print deserves a report, whether it is a list of names and addresses, a financial summary for a period, or a set of mailing labels. Again the Access Wizards walk you through the process of defining reports.

Pages (Access 2000 - 2003). Use pages to enter or display data via Internet. Pages are stored as HTML files, with data read from and written to the database. Michael Kaplan has published a free utility to convert Access forms and reports into Data Access Pages. Pages are deprecated in Access 2007.

Macros. An Access Macro is a script for doing some job. For example, to create a button which opens a report, you could use a macro which fires off the "OpenReport" action. Macros can also be used to set one field based on the value of another (the "SetValue" action), to validate that certain conditions are met before a record saved (the "CancelEvent" action) etc. Each line of a macro performs some action, and the bottom half of the macro screen provides the details of how the action is to apply.

Modules. This is where you write your own functions and programs if you want to. Everything that can be done in a macro can also be done in a module, but you don't get the Macro interface that prompts you what is needed for each action. Modules are far more powerful, and are essential if you plan to write code for a multi-user environment, since macros cannot include error handling. Most serious Access users start out with macros to get a feel for things, but end up using modules almost exclusively. On the other hand, if your needs are simple, you may never need to delve into the depths of Access modules.

Tips Microsoft Access (Access database files)

You can use Access to manage all of your information in one file. Within an Access database file, you can use:
  • Tables to store your data.
  • Queries to find and retrieve just the data that you want.
  • Forms to view, add, and update data in tables.
  • Reports to analyze or print data in a specific layout.

1 Store data once in one table, but view it from multiple locations. When you update the data, it's automatically updated everywhere it appears.
2 Retrieve data by using a query.
3 View or enter data by using a form.
4 Display or print data by using a report.

All of these items — tables, queries, forms, and reports — are database objects (database objects: An Access database contains objects such as tables, queries, forms, reports, pages, macros, and modules. An Access project contains objects such as forms, reports, pages, macros, and modules.).

Note: Some Access databases contain links to tables that are stored in other databases. For example, you may have one Access database that contains nothing but tables, and another Access database that contains links to those tables, as well as queries, forms, and reports that are based on the linked tables. In most cases, it does not matter whether a table is a linked table or actually stored in the database. 

Tips Microsoft Access (Tables and relationships)

To store your data, you create one table for each type of information that you track. Types of information might include customer information, products, and order details. To bring the data from multiple tables together in a query, form, or report, you define relationships between the tables.

1 Customer information that once existed in a mailing list now resides in the Customers table.
2 Order information that once existed in a spreadsheet now resides in the Orders table.
3 A unique ID, such as a Customer ID, distinguishes one record from another within a table. By adding one table's unique ID field to another table and defining a relationship between the two fields, Access can match related records from both tables so that you can bring them together in a form, report, or query.

FrontPage preserves your HTML tag formatting

Sometimes HTML editors don't display HTML tags the way you created them, changing lowercase tags to uppercase or changing tags colored blue to red. When this happens, you can lose the look of the HTML page you worked so hard to create.

By default in Microsoft FrontPage, the formatting of the HTML tags in your Web pages is maintained even if FrontPage doesn't understand them. If the page was created in another HTML editor, the content, syntax, and formatting of HTML for that page are not changed, even if the page contains errors or unrecognized HTML tags.

When you save the page, FrontPage saves any custom formatting on the HTML page — such as indentation, the case of tags, and so on — for any new HTML you've written. The original HTML for the page, however, will not be modified or reformatted in any way unless you actually modify that HTML in FrontPage.

Using the new "Preserve existing HTML" option

A new option in FrontPage, Preserve existing HTML, is selected by default. This option is on the Tools menu, in the Page Options dialog box, on the HTML Source tab. It keeps FrontPage from changing existing HTML on a page. Only new HTML inserted using FrontPage, or changes to existing HTML created by FrontPage, will be changed during a save or refresh of the page.

If you want FrontPage to make changes to all HTML on the page when the page is saved or refreshed, select Reformat using the rules below on the HTML Source tab. With this option selected, FrontPage applies the formatting options listed on the tab to all HTML tags on the page.

Type text


Type text such as lists into a body text placeholder.
1. The body text placeholder is usually positioned below a title.
2. Its default formatting is a bulleted list. At the end of a paragraph, press ENTER and then TAB to get to the next level of indent down.

The picture shows text typed within a body text (as opposed to a title) placeholder. This placeholder typically has five levels of text indents available, each with its own bullet style and ever-reducing type size. You'll rarely need so many indents, but PowerPoint offers them.

If you don't want a bulleted list, select the placeholder by clicking its border. Then click the Bullets button . Other buttons on the Formatting toolbar, such as the Center button , are handy for positioning text.

The indent buttons, such as Decrease Indent , help you position text at the right level of indent, and you can also use keyboard methods.
Automatic text fit If you type more text than fits in the placeholder, PowerPoint reduces the text size to fit it all in. You can turn this behavior off, if you prefer.

Add new slides


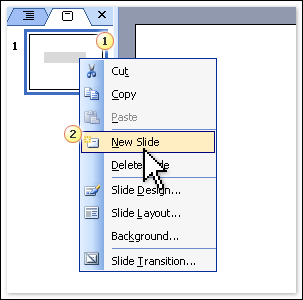
Use the Slides tab, the area on the left where the slide thumbnail is, to add new slides.
1. Right-click the thumbnail that you want the new slide to follow, and then…
2. click New Slide on the shortcut menu.

When PowerPoint opens, there's only one slide in the show. It's up to you to add the rest. Add them as you go or several at a time, as you prefer.

There are multiple ways to insert a new slide; you'll see all of them in this blog.

For now, here are two quick methods for adding a slide. On the Slides tab in the left of the window, either

* Click the slide thumbnail that you want the new slide to follow, and then press ENTER.

Or:
* Right-click the slide thumbnail that you want the new slide to follow, and then click New Slide on the shortcut menu.

cara Crop atau Potong Gambar di Microsoft Word

Untuk memotong gambar di Microsoft Word, ada dua cara. Kita bisa mengambil gambar dari dokumen tersebut, lalu menyuntingnya dengan aplikasi pengolah gambar. Itu cara pertama. Cara kedua adalah sunting langsung di Microsoft Word.

Misalnya, Anda hanya membutuhkan tampilan Standard toolbar, dari hasil tangkapan layar (print screen) yang sudah Anda lakukan. Proses pemotongan (crop) dapat dilakukan dengan langkah berikut.
  1. Paste hasil print screen Anda.
  2. Klik gambar yang dimaksud.
  3. Secara default begitu Anda klik gambar hasil print screen tersebut, toolbar Picture akan aktif.
  4. Klik pada ikon Crop di sebelah kiri ikon Line style.
  5. Klik, lalu seret sudut atau pada kotak putih kecil pada gambar yang dimaksud.
  6. Tentukan sesuai ukuran yang Anda kehendaki.

Inbox Repair tool


If you can't open your Personal Folders file (.pst) or your Offline Folder file (.ost), or you suspect that your .pst or .ost data file is corrupted, you can use the Inbox Repair tool (Scanpst.exe) to diagnose and repair errors in the file. The Inbox Repair tool scans only the .pst or .ost file, not your mailbox on the server running Microsoft Exchange. The tool determines whether the file structure is intact. If it is not intact, the Inbox Repair tool resets your file structure and rebuilds the headers.

The Inbox Repair tool works on both the Microsoft Outlook 97-2002 Personal Folders File (.pst) and the Office Outlook Personal Folders File (.pst) data files in Microsoft Office Outlook 2003 and Microsoft Office Outlook 2007.

Scanpst.exe is installed when you install Outlook. It is located at:

drive:\Program Files\Microsoft Office\OFFICE12.

Repair errors by using Scanpst.exe

1. Exit Outlook if it is running.
2. Double-click Scanpst.exe, located at drive:\Program Files\Microsoft Office\OFFICE12.
3. In the Enter the name of the file you want to scan box, enter the name of the .pst or .ost file that you want to check, or click Browse to search for the file.
4. To specify the scan log options, click Options, and then click the option that you want.
5. Click Start.
6. If errors are found after the scan is complete, you will be prompted to start the repair process to fix the errors.

A backup file is created during the repair process. To change the default name or location of this backup file, in the Enter name of backup file box, enter a new name, or click Browse to look for the file that you want to use.

7. Click Repair.
8. Start Outlook by using the profile that contains the .pst file that you tried to repair.
9. On the Go menu, click Folder List.

In the Folder List, you may see a folder named Recovered Personal Folders that contains your default Outlook folders or a Lost and Found folder. The recovered folders are usually empty, because this is a rebuilt .pst file. The Lost and Found folder contains the folders and items recovered by the Inbox Repair tool. Items that are missing from the Lost and Found folder cannot be repaired.

10. If you see a Recovered Personal Folders folder, you can create a new .pst file, and drag the items in the Lost and Found folder into the new .pst file. When you have finished moving all the items, you can remove the Recovered Personal Folders (.pst) file, including the Lost and Found folder, from your profile.

Notes
* If you are able to open the original .pst file, you may be able to recover additional items from your damaged .pst file. By default, the Inbox Repair tool creates a file called file name.bak, which is a copy of the original .pst file with a different extension. The .bak file is located in the same folder as your original .pst file. You may be able to recover items from the .bak file that the Inbox Repair tool could not recover. Make a copy of the .bak file, and give the file a new name with a .pst extension, such as bak.pst. Import the bak.pst file, and then move any additional recovered items to the new .pst file that you created.
* A copy of the log file is written to the same location as the .pst file.

Source: http://office.microsoft.com

Membuat fungsi Terbilang() Excel 97|2000|2002|2003|2007

MS Excel juga bisa menampilkan angka secara terbilang. Bagimana caranya ?

Anda harus membuat fungsi terlebih dahulu di vba (dengan menekan tombol Alt+F11)
Copy-kan script berikut ini dalam vba anda.
---

Public Function Terbilang(x As Currency)
Dim triliun As Currency
Dim milyar As Currency
Dim juta As Currency
Dim ribu As Currency
Dim satu As Currency
Dim sen As Currency
Dim baca As String
If x > 1000000000000# Then
Terbilang = "<>"
Exit Function
End If
'Jika x adalah 0, maka dibaca sebagai 0
If x = 0 Then
baca = angka(0, 1)
Else
'Pisah masing-masing bagian untuk triliun, milyar, juta, ribu, rupiah, dan sen
triliun = Int(x * 0.001 ^ 4)
milyar = Int((x - triliun * 1000 ^ 4) * 0.001 ^ 3)
juta = Int((x - triliun * 1000 ^ 4 - milyar * 1000 ^ 3) / 1000 ^ 2)
ribu = Int((x - triliun * 1000 ^ 4 - milyar * 1000 ^ 3 - juta * 1000 ^ 2) / 1000)
satu = Int(x - triliun * 1000 ^ 4 - milyar * 1000 ^ 3 - juta * 1000 ^ 2 - ribu * 1000)
sen = Int((x - Int(x)) * 100)
'Baca bagian triliun dan ditambah akhiran triliun
If triliun > 0 Then
baca = ratus(triliun, 5) + "triliun "
End If
'Baca bagian milyar dan ditambah akhiran milyar
If milyar > 0 Then
baca = ratus(milyar, 4) + "milyar "
End If
'Baca bagian juta dan ditambah akhiran juta
If juta > 0 Then
baca = baca + ratus(juta, 3) + "juta "
End If
'Baca bagian ribu dan ditambah akhiran ribu
If ribu > 0 Then
baca = baca + ratus(ribu, 2) + "ribu "
End If
'Baca bagian rupiah dan ditambah akhiran rupiah
If satu > 0 Then
baca = baca + ratus(satu, 1) + "rupiah "
Else
baca = baca + "rupiah"
End If
'Baca bagian sen dan ditambah akhiran sen
If sen > 0 Then
baca = baca + ratus(sen, 0) + "sen"
End If
End If
Terbilang = UCase(Left(baca, 1)) & LCase(Mid(baca, 2))
End Function

Function ratus(x As Currency, Posisi As Integer) As String
Dim a100 As Integer, a10 As Integer, a1 As Integer
Dim baca As String
a100 = Int(x * 0.01)
a10 = Int((x - a100 * 100) * 0.1)
a1 = Int(x - a100 * 100 - a10 * 10)
'Baca Bagian Ratus
If a100 = 1 Then
baca = "Seratus "
Else
If a100 > 0 Then
baca = angka(a100, Posisi) + "ratus "
End If
End If
'Baca Bagian Puluh dan Satuan
If a10 = 1 Then
baca = baca + angka(a10 * 10 + a1, Posisi)
Else
If a10 > 0 Then
baca = baca + angka(a10, Posisi) + "puluh "
End If
If a1 > 0 Then
baca = baca + angka(a1, Posisi)
End If
End If
ratus = baca
End Function

Function angka(x As Integer, Posisi As Integer)
Select Case x
Case 0: angka = "Nol"
Case 1:
If Posisi <= 1 Or Posisi > 2 Then
angka = "Satu "
Else
angka = "Se"
End If
Case 2: angka = "Dua "
Case 3: angka = "Tiga "
Case 4: angka = "Empat "
Case 5: angka = "Lima "
Case 6: angka = "Enam "
Case 7: angka = "Tujuh "
Case 8: angka = "Delapan "
Case 9: angka = "Sembilan "
Case 10: angka = "Sepuluh "
Case 11: angka = "Sebelas "
Case 12: angka = "Duabelas "
Case 13: angka = "Tigabelas "
Case 14: angka = "Empatbelas "
Case 15: angka = "Limabelas "
Case 16: angka = "Enambelas "
Case 17: angka = "Tujuhbelas "
Case 18: angka = "Delapanbelas "
Case 19: angka = "Sembilanbelas "
End Select
End Function

---
Untuk mencobanya anda tinggal memanggil fungsi tersebut =terbilang(12) atau mereferensikan ke sel lain dengan =terbilang(b12)
silahkan dicoba.

Semoga bermanfaat