Kamis, 04 April 2013

Distributing within an Enterprise in windows 8

Distributing an app within an enterprise requires the Enterprise edition of Windows 8. As you
might expect, the process for distributing within an enterprise is different than distributing
through the Windows Store. A typical scenario would have a LOB app developed and then
automatically pushed out to computers within the organization. Aside from the edition of
Windows 8 being used, there are three primary requirements for sideloading apps:
  ■ The target computer must be joined to the domain.
  ■ Group Policy must be set to “Allow all trusted apps to install.”
  ■ The app must be signed by a Certificate Authority (CA) that is trusted by the target
computer.
The Group Policy setting is found within the Windows Components\App Package
 Deployment hierarchy, as shown in Figure 6-12


Distributing in the Windows 8 Store

Distributing an app through the Windows Store involves several steps, including creating a
developer account, accepting various terms of service agreements, submitting the app for
approval, and setting its terms, among other things.

As described in the “Windows 8 app certification requirements” (http://msdn.microsoft.com/
library/windows/apps/hh694083.aspx ). Microsoft has several requirements for Windows apps:
  ■ The app must provide value.
  ■ The app must provide more functionality than a simple website.
  ■ The app must behave predictably.
  ■ The app must adhere to privacy and security practices.
  ■ The app’s content and subject matter must be appropriate for many audiences.
  ■ The app must be identified easily with a unique name and other information.

The certification process

The certification process to distribute an app through the Windows Store is a multistep
process. In the first step of the process, the app package is uploaded to Microsoft where it’s
checked for compliance with various app certification requirements
Among the tests that Microsoft performs are the following:
1.   Security tests, which are fairly basic malware-type scans.
2.   Technical compliance tests. The Windows App Certification Kit is used to test the app
      for compliance. The Windows App Certification Kit can also be used by the developer
      prior to submission in order to perform the same tests and help ensure a successful
      test when performed by Microsoft.
3.   Content compliance tests. The final test prior to release, the content compliance test is
     a manual process performed by someone at Microsoft.

When an app is approved, Microsoft performs digital signing of the app to prevent
 tampering, and then publishes the app to the Windows Store. However, you can set the
 release date and other aspects of the app, as described in the next section.

The app purchase experience

When potential customers find your app through the Windows Store, it’s your chance to
entice them to install or purchase your app. You do this by setting up a page on the  W indows
Store for your app. Your app’s page contains at least one screenshot (though more are
 encouraged) and other details about your app, such as its description, purchase price, rating,
and other details pertinent for the potential customer to know.

You choose the pricing model and structure for app distribution. You can offer the app for
free, provide a time-limited trial, a feature-limited trial, or set a price for the app that must
be paid prior to download. You can also set up in-app purchases to sell additional features
to customers. A frequent model for apps is ad-supported, whereby the app is offered for
free but then advertisements are displayed within the app. You can use any ad platform that

meets Microsoft’s certification requirements—which offers great flexibility to obtain the
 highest revenue for an ad-supported app.

Using Visual Studio to build a Windows 8 app

This section demonstrates how easy it is to build a Windows App. The demonstration shown
here will use Visual Studio 2012 Express edition for Windows to build an App. This example
builds a simple app that shows a list of the files inside of the Documents library on the
 computer and enables the user to select a file

The first step in building a Windows app is to choose a programming language and an
appropriate template. We’ll use JavaScript with the Blank App template for this example. This
is shown in Figure 6-5.

Once a template is chosen, Visual Studio opens the code for the chosen template. In this
case, the code is shown in Figure 6-6.

Visual Studio takes care of all of the behind-the-scenes setup and configuration for the
app based on the chosen template. This means that you could compile and run the project
as-is and it would display. In the case of the Blank App template, a blank screen with a simple
“Content goes here” note is displayed

Creating an app using one of the templates requires using the helper functions (created
automatically by the template), and then customizing and adding to them to produce the
app. In this example, we’ll add a single function to access some built-in functions that create a
File Picker.

With that code in place, the next area of customization needed is within the HTML file. The
Blank App template includes a default HTML file. The file, aptly titled default.html, contains
basic HTML and also the links to include CSS and JavaScript for the app. This file is shown
when the app is loaded, though this can be changed to start with any file that is appropriate
for your app.

For the example here, we’ll customize default.html for our needs. Specifically, we’ll add
some HTML, JavaScript, and also some CSS to the file. Like the JavaScript example, in a
 real-world scenario where you’re building a more complex app, it’s likely that the CSS would
be in a separate file and that the JavaScript would be as well.

The bottom portion of default.html is shown in Figure 6-8, with the new items highlighted
(the code above this in default.html is not changed).

With default.html saved, the app can be run, typically by pressing F5. The app’s splash screen
is shown and then the app is loaded. The output of the initial screen is shown in Figure 6-9.
Clicking or tapping the “Get Files List” button reveals the File Picker screen, shown in
 Figure  6-10.

The File Picker screen is built and its interface is set up primarily by the built-in functions
available as part of the Windows app library. This provides a consistent interface for the  
user when choosing files on the Windows 8 platform. Once a file has been chosen it  receives
a checkmark (like the one shown in Figure 6-10). Clicking or tapping Open then hands

 processing to your app, where you can perform the appropriate action for the file. In this case,
we merely output the name of the file back to the original screen, as shown in Figure 6-11.


This demonstration shows how easy it is to create a Windows app. In just a few lines of
JavaScript, HTML, and CSS, an app was created to choose files from the Documents library  
of a computer.

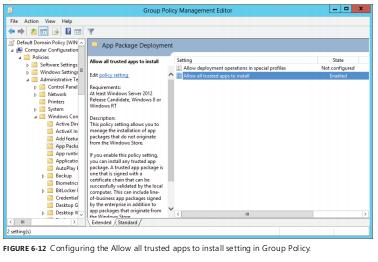
Once an app is created, it needs to be distributed. App distribution is accomplished either
by making the app available in the Windows Store or by loading it for internal-use only
through a process called sideloading . Both of these distribution methods are the focus of the
next two sections.

Building a Windows 8 app

Any edition of Visual Studio can be used to build apps for Windows. Though most
 organizations will use the Professional, Premium, or Ultimate version of Visual Studio, the
Express edition for Windows also includes the necessary Software Development Kit (SDK) for
developing Windows apps.

         When an App is built, it becomes an App Package. The App Package contains the files for
the App along with the package manifest. The package manifest contains information about
the App, including how it interacts with the computer or device, what resources it needs, and
so on

         Organizations can continue to use their language of choice for developing Windows apps.
For example, an organization standardized around Visual C# development with the requisite
in-house expertise can continue to use Visual C# for Windows App development. One of the
most powerful features of Windows apps is that they can be built using several languages:
  ■ JavaScript
  ■ Visual Basic
  ■ Visual C#
  ■ Visual C++

       Among these languages, Visual Basic, Visual C#, and Visual C++ are traditional client-side
languages that can be used to build server-side web applications. However, the addition of

      JavaScript is noteworthy for Windows app development. The inclusion of JavaScript in the
available languages for Windows app development means that organizations with expertise
in HTML, CSS, and JavaScript can build fully functional Windows apps that have the same
capabilities as apps developed in the other languages.

        Visual Studio includes five templates customized for each of the available Windows
App development languages. The templates help with the development process and show
 common design patterns and layouts for Windows apps. Some of the templates are shown in
Figure 6-2.

      The five templates provide a good sampling of the design patterns needed for many types
of apps. The type of information and user interaction expected for the app drives the choice
of template. For example, an app that needs to display more than one item might choose a
Grid App template, such as the one shown in Figure 6-3

      An app that needs to enable drill-down for detailed information might choose a Split App
template, such as the one shown in Figure 6-4.

       If one of the available templates isn’t appropriate, the developer can use Blend to design
the layout for the app